Building Stairs Out of Timber
Updated: 2021-10-13
Article by Bill Bradley
I guess that the very first timber stair was a log that was leaned up against something at a higher level, and early man walked up it instead of climbing using his hands. It wouldn't have been long before notches were cut into the log to make steps.
We have improved a bit since then, but the basic requirement is the same, to get to a higher level easily and with safety.
- The simple notch cut with an axe has changed to separate pieces of timber.
- The one we stand on is called a tread.
- If there is a vertical piece it is called a riser.
- Quite often we have no actual riser, we leave the space open, so we call the stair an open tread design.
- To hold the treads in the correct position, and to provide strength and stability to the stair or staircase we use heavy timbers at each side called strings or stringers.
Indoor Closed String Stairs
The stair type shown below is usually made in a workshop, and transported to the job site, and then it is lifted into position by a number of men.
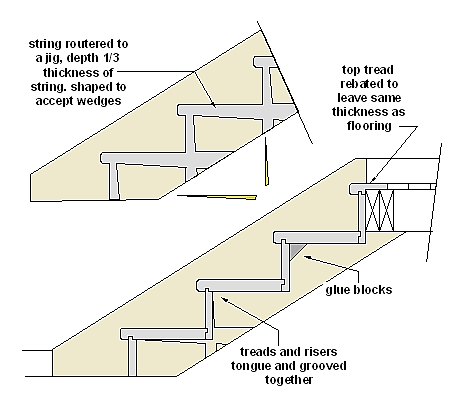
- With all stairs, the stringers are marked out in a pair,that is a left and a right, with the position of the treads and risers on them.
- With this style there is also added to the set out an allowance for the timber wedges.
- The strings are routered out to a minimum depth of 13mm or 1/2" or so, but certainly no more than one third of the thickness of the string.
- Quite often a staircase like this fits between two walls, and so the first assembly can be done using nails because the nail heads will not be seen.
- Then when it is all in place, the glued wedges are driven home to make the whole thing extremely solid.
- When either one side or both is later seen, the staircase is assembled with clamps and then the wedges are driven in.
- After the wedges are fixed and the whole thing is solid, it is common to then use 45 deg. fillets say 50mm x 50mm as glue blocks.
- These blocks are glued between:
-The tread and the stringer.
-The riser and the stringer.
-The riser and the stringer.
-About every 400 on the joint between the tread and the riser.
- In an old staircase these glue blocks quite often dry out and their glue bond is broken.
- This is the main cause of squeaking in this type of stair and it can be easily fixed by re-gluing the blocks.
- You can see in the sketch that top and bottom cuts vertical to the strings are are done to suit the height of the skirting or baseboards, if any.
- More often than not, a stair like this will be lined on the underside, although sometimes when there is a small cupboard underneath it is not.
Indoor Cut String Stairs
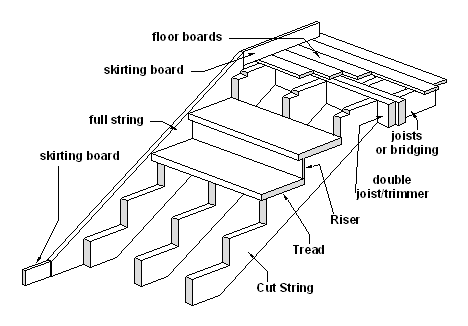
Another popular method of internal timber stair construction is by using cut strings as the load bearing members.
This method is popular in North America. Compared to the routered method, cut strings have a some advantages and some disadvantages.
- The heavier and larger structural members can be cut from lower grade cheaper timber as they can be completely hidden in the final stair.
- The face timbers which are often of expensive hardwood can be a lot thinner and so cheaper.
- One man can build and erect this type of stair fixing one piece at a time.
On the other hand, I believe that they are probably more labour intensive, and because the strength of the cut supports are in the section under the triangular cut outs, then they have to be deeper over all.
Outdoor Timber Stairs
For external all timber stairs up to say 1200 wide I like to use 50mm thick hardwood stringers and treads, with the treads open, that is no risers.
- External timber stairs are subject to the weather obviously, and so I always treat the various timbers with plenty preservative and or decking oil before assembly. Particularly the end grain and the routered sections, as they will never be oiled later on.
- To get timbers for the treads that are wide enough, and then to stop them twisting and shrinking as they get weathered is very hard.
- A good compromise is to use more than one piece of timber in the treads, with a gap between each.
- The strings are routered out to 12mm deep.
- The stair is assembled with 75 x 3.2 bullet head galvanised nails.
- Under every second tread I like to see a long 12mm bolt, made out of all threaded galvanised rods, with large square Gal. washers at each end.
- These bolts are the things that really hold the job together. They give it the stiffness it needs, and also when the timber has weathered and maybe shrunk and started to twist, a few turns with a spanner will tighten things up again.
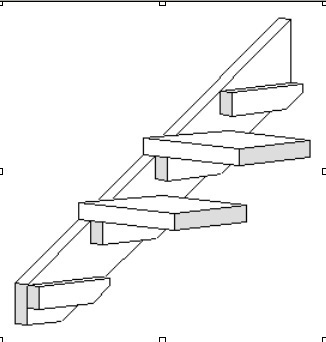
Another Simple Outdoor Stair
Even simpler than the previous example, if you don't have a router or if you don't want to take strength out of your stringer, is to use cleats to support the treads.
This is quick and easy with nails, for a temporary stair during construction, or for a bit better finish with screwed and plugged fixings.
The cleats supporting the treads can be pieces of timber, but another way would be to use galvanised angles pre-drilled for screws or bolts. If screws are used as the fixings they can be from underneath. This way the top of the tread is unmarked.
So with screws or bolts into the string and screws or bolts into the treads, there may be no need to use the long threaded rod bolts under the treads to hold the stair strings together.
Find more about stairs in Stairs&Railing
Bill has his own building related website.
Comments (0)